meal prep

Chicken Caprese Salad Jars: An easy fueling lunch for busy parent OR athlete!

Chicken Caprese Salad Jar solo.JPG

This is a new creation that is fast and absolutely fabulous! I feel like I’m being dramatic in saying that, but really, it is so delicious. I thought it would be pretty good, but after mixing it up and taking a bite, I even surprised myself! The mix of flavors is just so. darn. fantastic. The balsamic melds with the quinoa and then you mix that with the basil and mozzarella, pinch of salt and pepper, the sweet tomatoes and the flavor-packed tender rotisserie chicken. Really, friends, I hope you make a bunch of these for busy weeks ahead!

I love these, yes, because they are delicious, but also because it’s everything in one jar! Just make sure you have a fork on hand to dig in! This recipe is easy for a quick break between shuttling kids or taking care of babies, a satisfying and energizing lunch between meetings at work, AND an easy lunch for the young athlete! I eat this straight from the jar or deconstruct the salad on one plate. Now, I absolutely LOVE the ingredient combo in this one and think the flavors and textures are spot on, but you can, of course, mix it up if you want. I fully intend to do this in the weeks to come. Although, I’ll probably always end up coming back to this guy. Just. So. Good.

Deconstructed Caprese Salad Jar.JPG

Constructing Salad Jars for the Young Athlete

Now, let’s shift focus to the young athlete for a minute. What if you are making this for your athlete? Maybe it’s for his or her school lunch or a pre or post game / practice dinner? What should your salad jar consist of? How much of each ingredient should you include? Here is how I would think about it:

  1. You need at least 3 different food groups (out of the 6: meat or meat equivalent, fruit, veggie, grains/starch, dairy, healthy fat)

  2. You need a source of protein (one food group), you need a source of carbohydrate (grains, starchy veggies, fruit, milk / yogurt), and you need some colorful veggies!

  3. The meal needs to work with the training schedule and performance goals AND be something he or she actually WANTS to eat (that’s a big one!). What are the athlete’s goals right now?? What sport is he or she in? What foods does he/she like? This will determine the composition and portions of the jar!

    • If your young athlete is in a season of heavy training…

      • there should be more grains & starch than what is in my salad pictured here (I am not in a season of heavy sports training and 2-a-days). The grain/starch choice is your athlete’s main source of energy in this dish. Protein must be present as well, and make sure you can squeeze some veggies in there!

    • If your athlete is in the off season or maybe his/her sport is not as intense …

      • he or she will want a greater amount of the veggies than the grains and starch. Still make sure their is a source of protein!

    • If weight loss is a concern and you’re trying to help your athlete maintain his/her weight during the season…

      • Make whole grains and/or starchy veggies the majority of the jar. the 2nd highest ingredient should be the protein (for maintaining / building lean muscle). Include the veggies that you can. Accompany with some healthy fat, as tolerated.

    • Make sure to include a little healthy fat for satiety, even if weight maintenance isn’t your goal, unless practice or performance is within the next couple of hours or so (although some athletes in lower intensity sports can tolerate fats like peanut butter, nuts and seeds, and avocado just fine before practice).

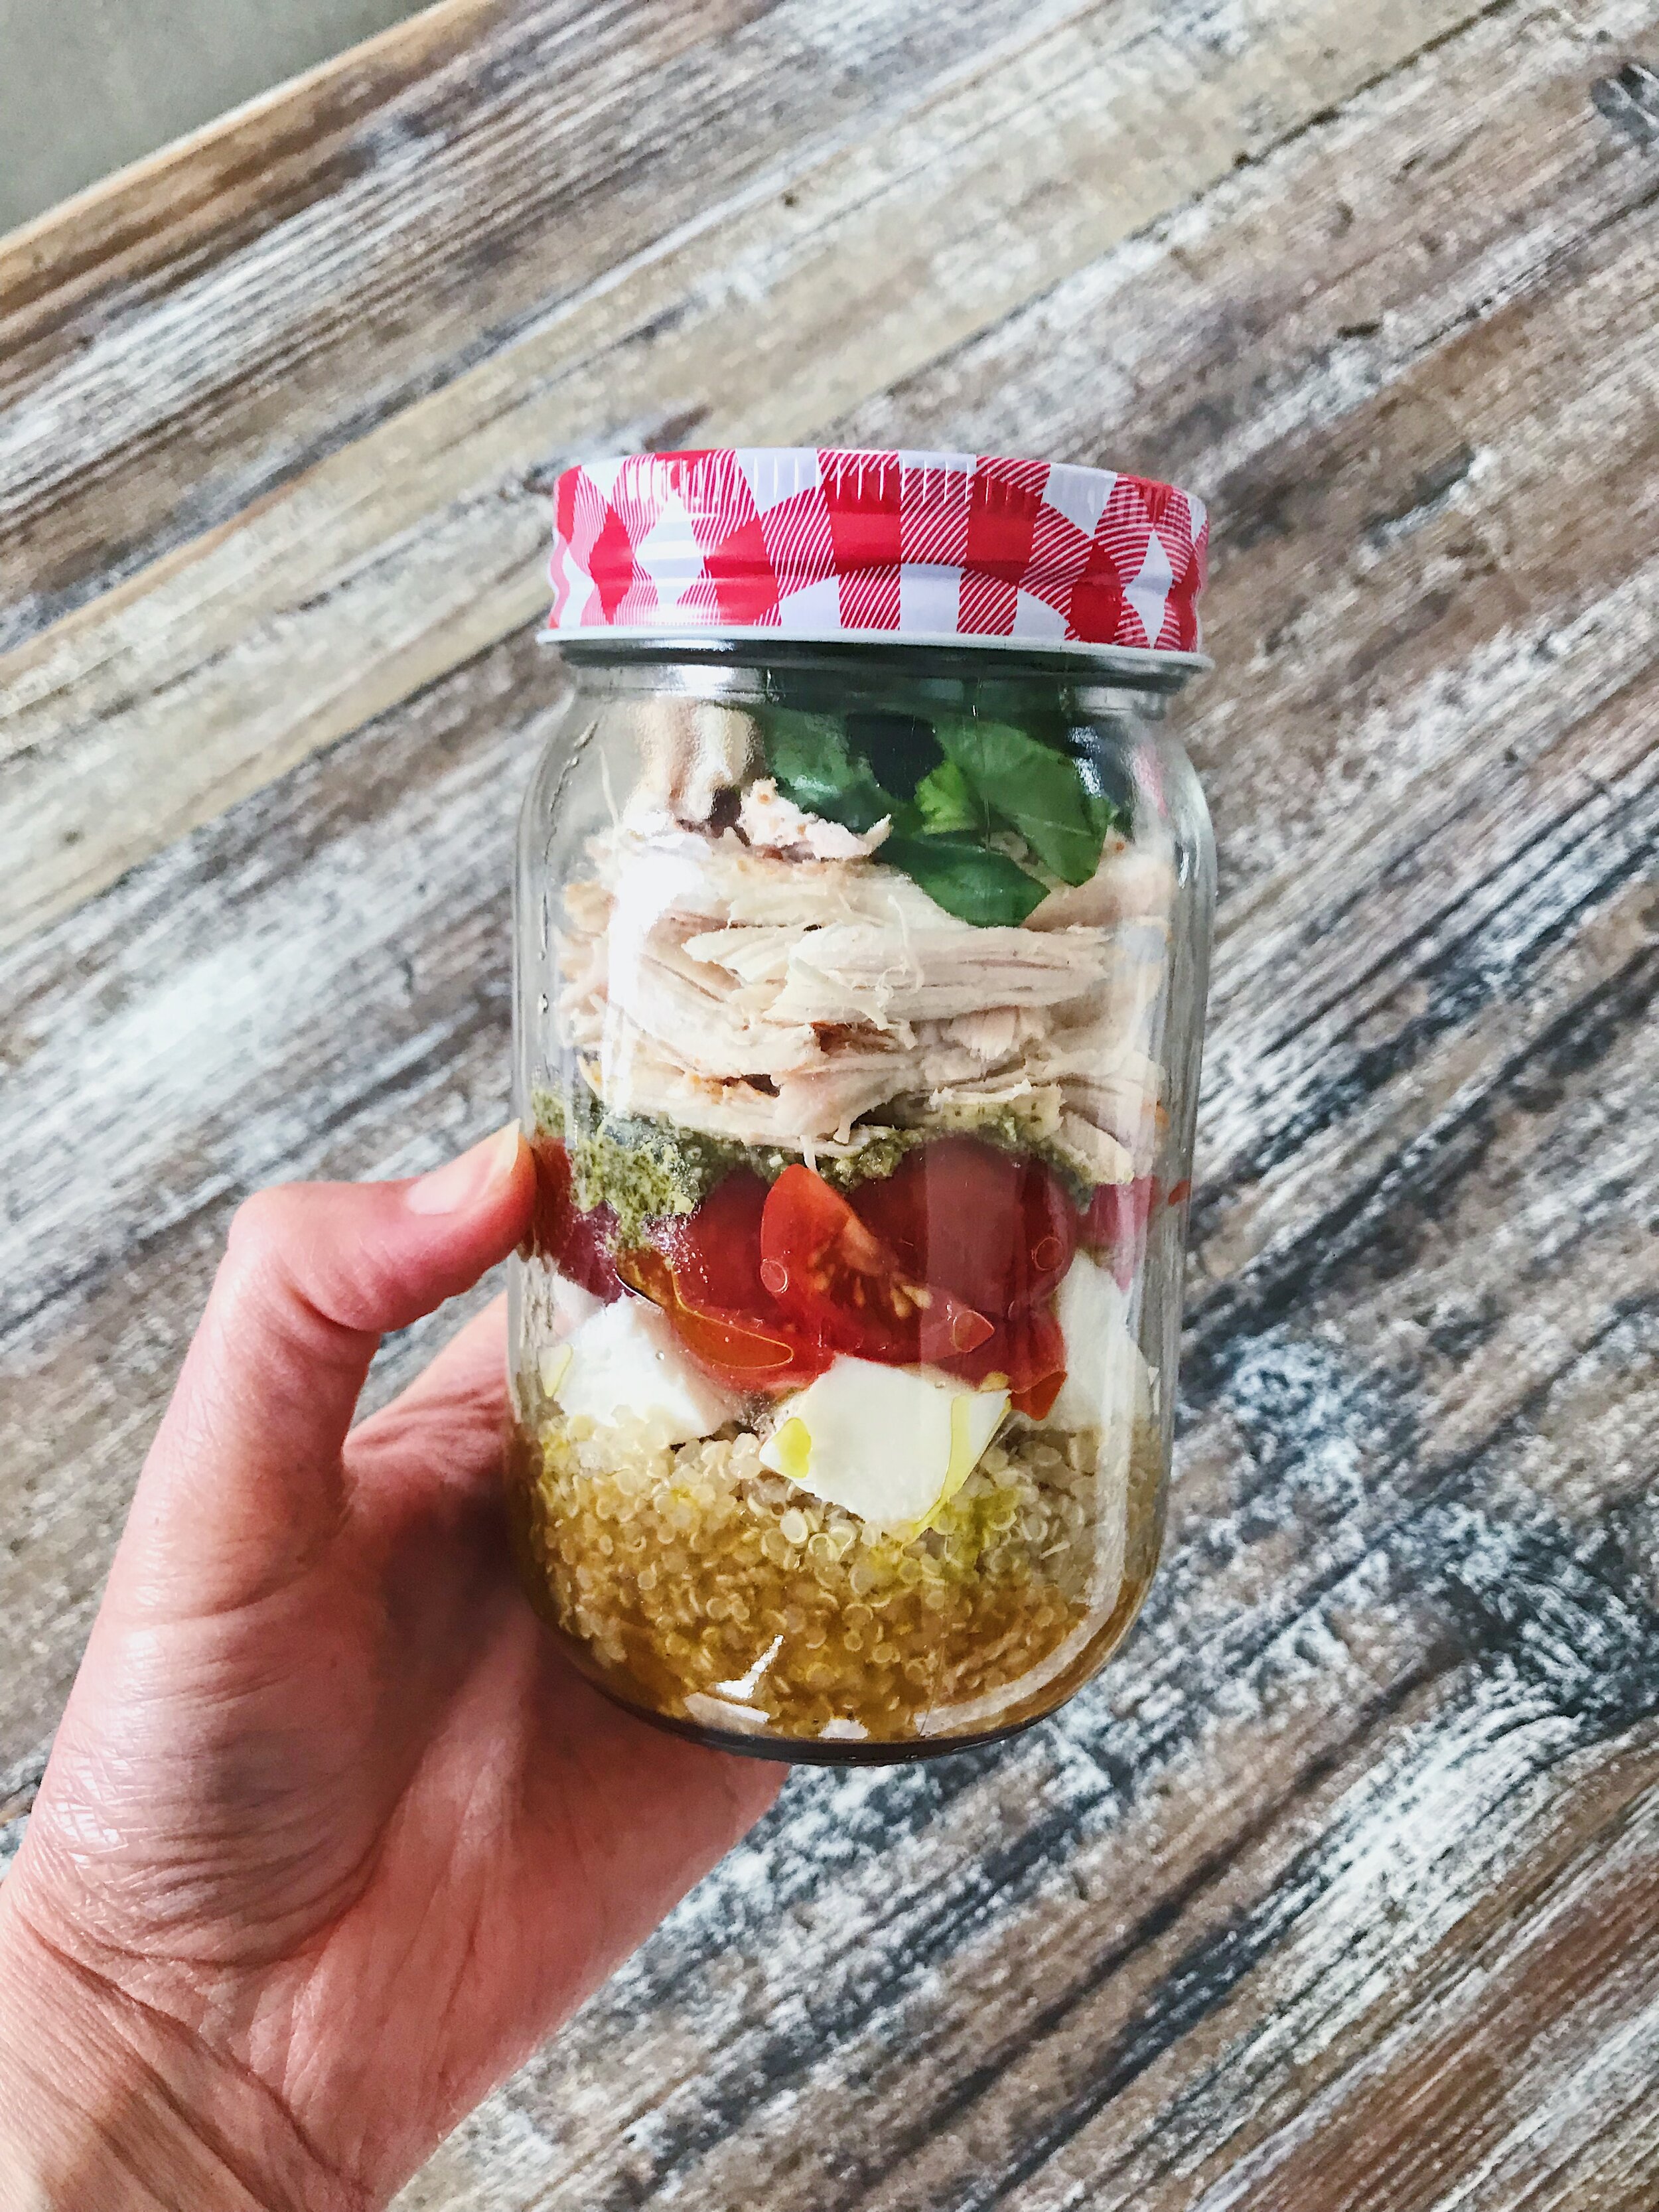
    • Make sure there is something that adds flavor! In my Chicken Caprese Salad jar, the balsamic vinaigrette at the bottom of the jar infuses through everything and adds a new dimension of flavor. Then, to top it off are the shreds of basil, a drizzle of pesto, and the rotisserie chicken.

  4. What didn’t fit in the jar? This is the great feature of a meal, but in most cases, it shouldn’t be the only thing. Veggies didn’t fit? Add them on the side with some hummus or Greek yogurt dip. Don’t feel like you got enough grains? Accompany with some whole grain crackers or a hearty granola bar. Athlete still feels hungry after lunch? Add a Greek yogurt, cup of cottage cheese or string cheese to pump up the protein, which aids in satiety. And there’s always room for fruit! It’s adds energy from quality carbohydrates as well as fluid and a little something sweet to accompany the meal.

Do you already do salad jars in your home? If so, tell me about it by commenting below! I and others would love to hear your ideas! Questions about portions or ingredients? Put those in the comments as well.

Happy Fueling!

Taylor

Chicken Caprese Salad Jars aerial.JPG


Chicken Caprese Salad Jars

Serves 1

INGREDIENTS:

  • 2 Tbsp Balsamic vinaigrette (store bought or homemade, see recipe below)

  • 1/2 cup Cooked quinoa

  • 1/2 cup Diced fresh mozzarella cheese

  • sprinkle of salt & pepper

  • 1/2 cup Halved cherry / grape tomatoes

  • 1 tablespoon jarred pesto (or more if desired)

  • 1/4 to 1/2 cup Pulled rotisserie chicken (you can make yourself but I’m typically using store bought)

  • 1 teaspoon Julienned Basil

INGREDIENTS FOR QUICK & EASY BALSAMIC VINAIGRETTE DRESSING:

  • 3 tablespoons extra virgin olive oil

  • 1 tablespoon balsamic vinegar

  • 1/2 tablespoon honey

  • a pinch of salt & pepper

DIRECTIONS:

  1. If using homemade dressing, whisk all ingredients together in a small mixing bowl or pour all ingredients into a small mason jar, close the lid, and shake up to combine all ingredients.

  2. Using a medium-size spoon (like a soup spoon), spoon ingredients into jar, one layer at a time in the following order:

    • Balsamic vinaigrette

    • Quinoa

    • Fresh mozzarella

    • salt & pepper

    • Halved tomatoes

    • Jarred pesto

    • Chicken

    • Basil

      *I try to press it down just a little to make sure I can get all the delicious ingredients inside.

  3. Screw the top on and store in the refrigerator until ready to use!

  4. Enjoy!

Tender Juicy Oven - Baked Chicken Breasts

IMG_4108.JPG

Raise your hand if you're too familiar with dry bland cooked chicken breasts.  Taking it a step further, who instantly associates "baked chicken" with "tough" or "flavorless"?  I was absolutely one of those people!  Even some of my chicken salads with all of the dressing and mix-ins would end up dry.  That chicken would absorb any moisture in a 10 foot radius before I even had a chance to put it in the fridge!

Well, one weekend last month, I decided enough was enough.  I did a little online searching, comparing different blogs and websites and came up with this method of baking my chicken breasts.  It was still pretty quick prep and to my excitement, it came out of the oven so tender and juicy.  Even better, it stayed fairly tender and moist the following days, whether I shredded it and incorporated it over a spinach salad, added it to tacos or a flatbread, or mixed it with a dressing and turned it into a fun chicken salad!

I love this method because it acts as a base from which you can add whatever flavors you want, from herbs and spices to a variety of vinegars, and you still have a moist, tender chicken dish.  Or you can keep it simple, adding only a little salt and pepper, to incorporate in various dishes throughout the week!  Keep reading for this short and simple trick to Tender, Juicy Oven - Baked Chicken!

Happy Fueling!

Taylor


TENDER JUICY OVEN-BAKED CHICKEN

Makes 2 Chicken Breasts

IMG_4114.JPG

INGREDIENTS:

  • 1 - 1.5 pounds raw boneless skinless chicken breast

  • 1/2 teaspoon olive oil

  • 1/8 or less teaspoon salt

  • 1/2 of a whole lemon, cut into quarters

  • 1/2 tablespoon butter (or less) or cooking spray, to grease one side of parchment paper that goes over the chicken.


DIRECTIONS:

IMG_4113.JPG

1. Preheat oven to 350 degrees F.

2. Line a baking sheet with parchment paper.

3. Place chicken breasts on the parchment paper and brush chicken breasts with the olive oil.

4. Sprinkle chicken with the salt.

5. Place the 4 pieces of lemon on the baking sheet with the chicken.

IMG_4110.JPG

6. Butter or spray with vegetable spray a second piece of parchment paper that is big enough to fit over the baking sheet and seal in the chicken and lemon wedges (I usually just take a stick of butter and run it over the surface of the parchment paper until the paper is pretty coated with a thin layer) .

IMG_4112.JPG

7. Place that second sheet of parchment paper butter / oil - side - down over the chicken and lemon wedges and seal around the sides of the baking sheet.

IMG_4108.JPG

8. Bake the chicken in the preheated oven for 30 to 35 minutes.

IMG_4106.JPG

9. Your final product should be super easy to slice with a knife, or shred with two forks and no longer pink in the middle. If you have a meat thermometer, the internal temperature of the thickest part of the chicken should read 165 degrees F.

10. Serve right away or save for meals later in the week!

NUTRITION NOTES:

Chicken provides us with protein, niacin, vitamin B6, among other nutrients.

1 ounce of cooked chicken has about 7 grams of protein.

Up and At 'Em Egg Cups

09_2_Complete Cups Up Close.JPG

School, work and fall sports are officially in full swing and so is the desire to continue those fitness and nutrition efforts you began during the spring and summer months.  Between getting up, getting ready for work, getting ready for school, packing the soccer / swim / skating / cross country / gym / (your chosen activity here) bag and getting yourself to the office or the kids to practice, to school, or all of the above, a good breakfast can often get lost in the shuffle.  A quick bowl of cereal is, of course, an easy go-to but sometimes, even with all the varieties out there, that can get old.  Plus, so many cereals are high in sugar and low in protein, fiber and other nutrients, leaving you or your athlete starving two hours later.

As a young figure skater and cross country runner growing up, I remember that, between my 4:30 a.m. alarm clock, my 5:30 a.m. ice time, and my 7:50 a.m. school bell, there was hardly ever enough time for a good breakfast.  Now, years later, between my early morning alarm, getting in some writing, emails, recipe development or program brainstorming, going on my morning run, and quickly putting myself together to get to the office, I still find many mornings to be one crazy whirlwind.  For this reason I set out to create a quick & easy breakfast option that would energize and satisfy me after my morning run as I headed off to work.

My recipe for you this week is my Up & At 'Em Egg Cups.  With their bursting roasted tomatoes, caramelized onions, spinach and sprinkle of feta and Parmesan cheese, you will look forward to breakfast each morning!  Not only are these little cups delicious, but the eggs offer protein, choline, lutein, and a little vitamin D, the roasted tomatoes offer a punch of lycopene (even more than raw tomatoes!) and vitamin C, the spinach tops it off with a little folate, iron (better absorbed by the vitamin C in the tomatoes), and vitamin K, and the onions offer additional vitamin C.   Add a slice of toast, diced fruit, a yogurt or glass of milk, and you have a winning breakfast that, with its mix of protein, complex carbs and antioxidants, will replenish you after a morning workout and refuel you for the busy day ahead.

So here you go... my Up & At 'Em Egg Cups.  Enjoy!


Up & At 'Em Egg Cups

Makes 8 eggs cups;  Serving Size = 2 cups

INGREDIENTS:

01_Ingredients.JPG
  • 5 whole eggs

  • 1 cup cherry tomatoes

  • 4 teaspoons olive oil

  • 1/4 teaspoon ground coarse sea salt

  • Ground pepper, to taste

  • 1 1/2 cup chopped white onion (about 1/2 of a large onion)

  • 1 packed cup fresh spinach, torn or chopped

  • 1 tablespoon feta cheese

  • 4 teaspoons grated Parmesan cheese


DIRECTIONS

1. Preheat the broiler on HIGH and line a medium-sized baking sheet with tin foil.

2. Crack the eggs into a medium mixing bowl, add 1/8 teaspoon of salt, a dash of pepper and beat all ingredients together with a wire whisk. Set aside.

02_Whisk Egg Mix.JPG

3. In a medium bowl, using a heat-resistant rubber spatula, stir together the tomatoes with 1 teaspoon olive oil and 1/8 teaspoon of salt and then spread onto the foil-lined baking sheet.

4. Place the baking sheet with the tomatoes in the preheated oven and broil for 7 - 10 minutes until tomatoes are bursting and start to char, stirring with the spatula half-way through.

03_Roast Tomatoes.JPG

5. While the tomatoes roast, heat 2 teaspoons olive oil in a skillet over medium heat. Add the onions and cook about 10 - 15 minutes until caramelized, stirring occasionally with spatula.

05_Onions and Garlic.JPG

6. Once the tomatoes are done cooking (while onions are still cooking), grease an 8-cup muffin tin and set oven temperature to 350 degrees Fahrenheit.

7. After the onions have cooked for about 10 minutes and are beginning to caramelize, add the roasted tomatoes, spinach and feta to the skillet, stirring to combine all ingredients. Continue to cook about 3 minutes more, removing from the heat when spinach is wilted and feta is well incorporated.

06_Add Tomato Spinach Feta.JPG

8. Divide the onion - spinach mixture evenly into each muffin cup (about 2 tablespoons of the onion - spinach mixture per muffin cup).

07_Add Veggies to tins.JPG

9. Divide the egg mixture evenly among each muffin cup (about 3 - 4 tablespoons of the egg mixture per muffin cup).

08_Add Egg mix to tins.JPG

10. Using a small spoon or dull dinner knife, stir the ingredients in each egg cup to incorporate the onion-spinach mixture and the egg together well.

11. Top each cup's egg mixture with 1/2 teaspoon grated Parmesan cheese.

12. Bake in the preheated oven for about 15 - 25 minutes until the egg cups puff and begin to brown on top.

13. Let the egg cups cool about 5 minutes after removing from oven. Then run a knife around the edges of each cup to loosen anything sticking to the tin and remove with a small fork or spoon.

14. Eat immediately or allow to cool on a plate, wrap individually in plastic wrap and store in the refrigerator for a quick breakfast - on - the - go or mid-morning snack!

09_3_Egg Cups Complete aerial.JPG

Make It Again!  The best thing to do is find a one-hour weeknight or weekend time slot that you can devote to making a big batch of these.  Then wrap them individually in plastic wrap or foil and store them in the refrigerator or the freezer to quickly heat up and enjoy before running out the door in the morning or bring it along to heat and quickly eat at the office!  (Reheat refrigerated cups about 45 seconds and reheat frozen cups about 1 min, 30 seconds)

NUTRITION INFO (per 2 cups):

Calories 175;  Protein 10g;  Carbohydrate 8g;  Total Fat 12g (sat 3g, mono 5.75g, poly 1.75g);  Sugar 4g;  Added Sugar 0g;  Sodium 310mg;  Cholesterol 210 mg;  Potassium 300 mg;  Calcium 105 mg