Family-Style Chicken Caprese Salads

Chickn Caprese Salad side view.JPG

Hi there! It’s been a minute since I have posted a new recipe so I’m really excited to get this one up today! I created this recipe way back in the summer when still pregnant with baby girl. I love my Chicken Caprese Salad Jars and, one night when in search for an easy summer dinner idea for me and my husband, I decided to make a deconstructed version of that and see how it would go. Turns out it was a hit! This salad is really easy to throw together and while it is simple, it is also full of flavor! My husband loves it every time we make it. You can bake or grill your chicken for this dish or you can do what I end up doing much of the time and use store-bought rotisserie chicken and shred it into the salad. You can also use your favorite store-bought balsamic vinaigrette, but I always end up whisking mine together from a few ingredients I always have on hand (recipe below). This has been a great go-to recipe for busy weeknights and, bonus, you can pack up any leftovers and store in the refrigerator for a salad for lunch the next day! I love this salad because it’s got most of your meal components in one bowl - protein, dairy, veggie, and whole grain. Sometimes I include quinoa in this salad (it is in the jars) but when I don’t we always have fresh bread with it (and may dip it in our leftover vinaigrette - yum!). Hope you enjoy this as much as we do!

Happy Fueling!

Taylor


family-style chicken caprese salad

Makes 2 to 3 salads

SALAD INGREDIENTS:

Chkn+Caprese+Salad+ingredients.jpg
  • 6 cups mixed greens

  • 1 cup diced mozzarella cheese (I buy one ball of mozzarella and that makes at least 1 cup diced)

  • 1 cup halved cherry tomatoes (typically about 1/2 a pint)

  • 1 1/2 tablespoons jarred pesto

  • 1 cup warm pulled rotisserie chicken (or bake/grill your own and shred)

  • About 2 to 3 tablespoons Balsamic Vinaigrette dressing (store-bought or my recipe below)

  • 6 leaves fresh basil, julienned or torn

BALSAMIC VINAIGRETTE INGREDIENTS:

  • 2 tablespoons extra virgin olive oil

  • 1 tablespoon balsamic vinegar

  • 1 teaspoon honey

  • pinch of salt

BALSAMIC VINAIGRETTE DIRECTIONS:

  1. Combine all ingredients in a small mixing bowl and whisk quickly to combine all ingredients.

  2. Drizzle over your favorite salad or use as a dip for fresh bread and enjoy!

Chickn Caprese Salads_step 2.jpg

SALAD DIRECTIONS:

  1. In a large bowl, toss the mixed greens with the Balsamic Vinaigrette dressing (you can use more or less dressing as preferred).

  2. In a medium bowl, toss together the cheese, tomatoes and warm chicken with pesto. If chicken has been stored in the refrigerator warm it up for about 15 seconds in the microwave.

  3. Top the mixed greens with the pesto coated chicken, cheese & tomato mixture.

  4. Add torn or julienned basil to the top and serve!

Chickn Caprese Salads_aerial.JPG

Oh My Gosh Good Oven Baked Crispy Chicken Nuggets

crispy chicken nuggets 1.JPG

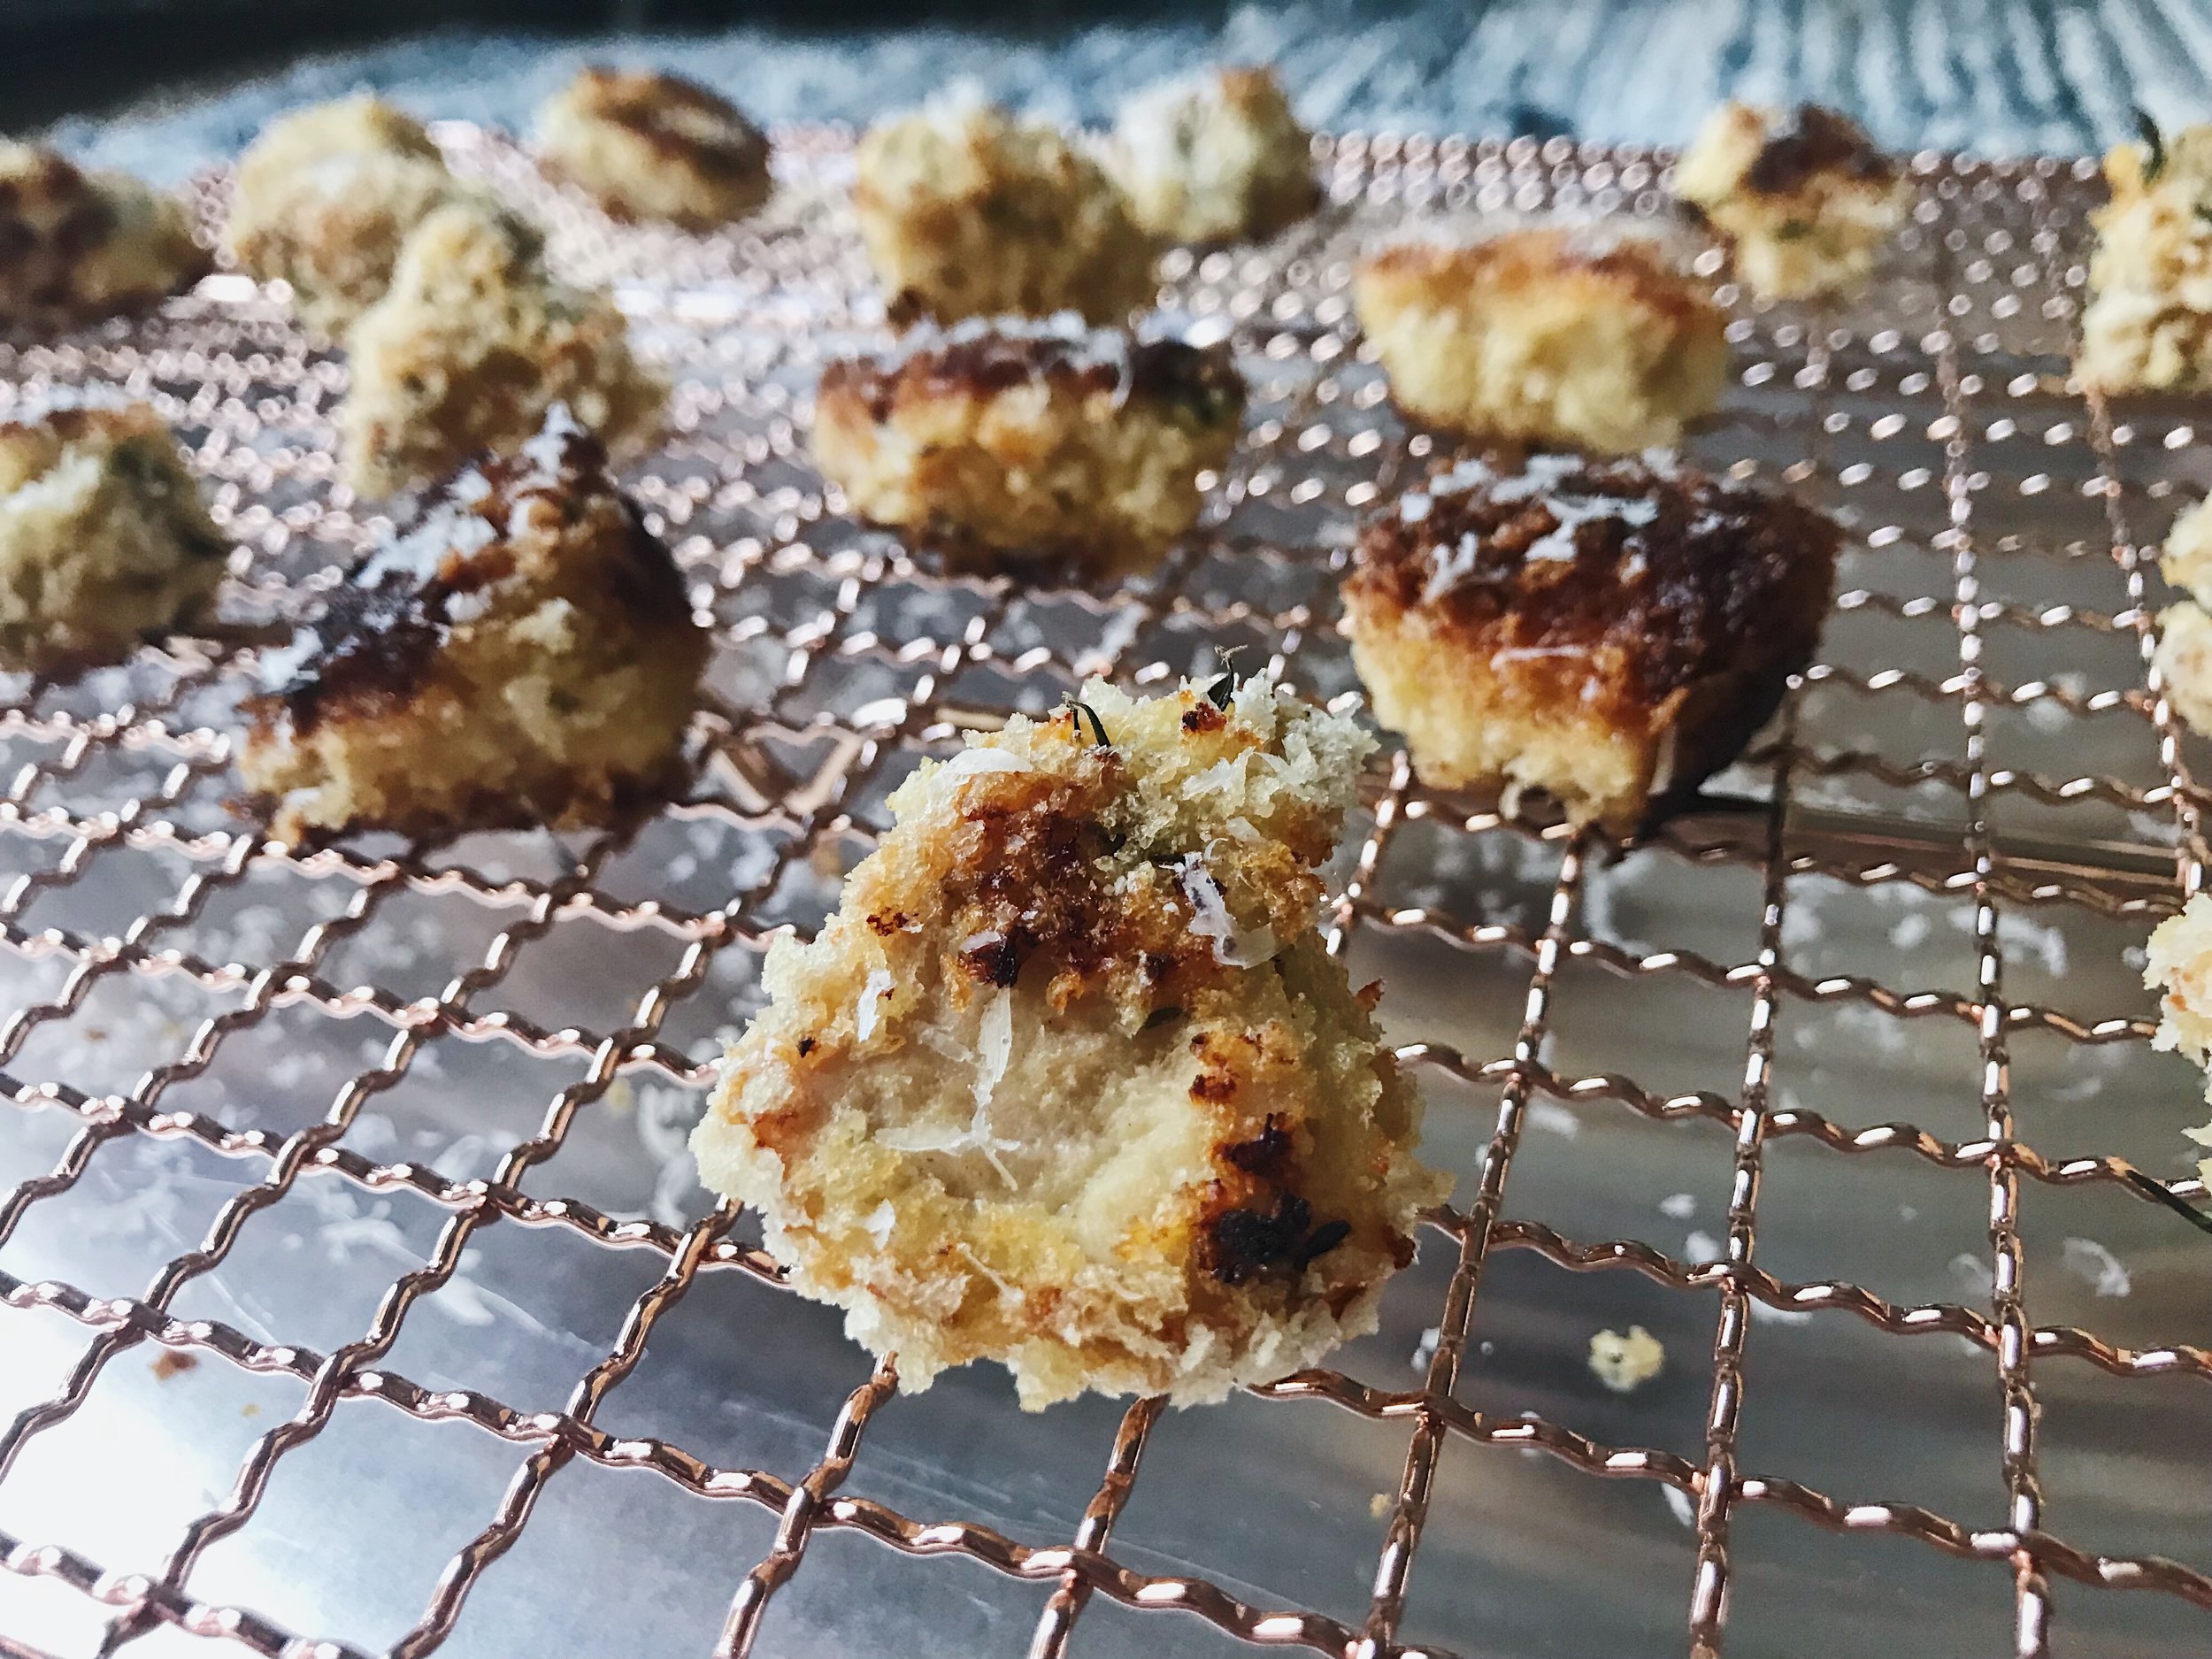
Belieeeeve me when I say these are DELISH! I know, chicken nuggets, maybe not your typical blog recipe, but the other day I got curious and, after some brainstorming and playing around in the kitchen, this is what we got! I think I knew they were a success when I saw Kyle’s response. He was underwhelmed, to say the least, to hear that we were having chicken nuggets for dinner, ha. In fact, we actually planned to have fish for dinner and I would use the nuggets for lunches throughout the week. BUT, I had him try them and he loved them so we decided to enjoy them for dinner that night! I made them 2 different ways - one pan-seared / sauteed and the other baked. While the sauteed ones had their one delicious richness that must certainly be noted we felt like we could taste the fresh thyme and all flavors better in the baked ones . So today I’m sharing my recipe for these easy Oven Baked Crispy Chicken Nuggets. I think it’s something the whole family will be excited about!

Happy Fueling!

Taylor

Oh My Gosh Good Oven Baked Crispy Chicken Nuggets

Makes about 20 to 30 chicken nuggets

INGREDIENTS:

  • 1 pound boneless skinless chicken breasts

  • 2 tablespoons Dijon mustard

  • 2 teaspoons white wine vinegar

  • 1 whole egg, lightly beaten

  • 2 pinches of salt + 1/4 teaspoon salt

  • 1 1/2 cup Panko bread crumbs

  • 1 1/2 teaspoon dried thyme

  • 1 teaspoon dried rosemary

DIRECTIONS:

  1. Dice raw chicken into about 1/2 - inch pieces.

  2. In a medium mixing bowl, mix together the Dijon, white wine vinegar, egg and pinches of salt.

  3. Add the diced raw chicken to the Dijon mixture and toss with a rubber spatula or large spoon to combine all the chicken with the marinade. Cover the bowl with plastic wrap and place in the refrigerator to marinate overnight (you could do just an hour or so, but it’s so much better when you let it marinate!)

  4. When ready to cook, preheat the oven to 350 degrees F.

  5. Plate an oven safe baking rack onto a baking sheet.

  6. While the oven preheats, combine the breadcrumbs, thyme, rosemary and salt in a shallow baking dish and mix all ingredients to combine.

  7. Use a fork or your fingers to roll marinated chicken pieces in breadcrumb mixture until fully covered and place chicken on baking rack.

  8. Cook chicken nuggets on baking rack in preheated oven for 15 minutes. After 15 minutes, raise the temperature to 400 degrees F and cook for another 10 to 15 minutes. Breadcrumbs should start to brown on top. (I don’t always do this, but I’ve found that spraying a little vegetable oil over the top of the nuggets helps them brown better in the oven. Either way, though, they still taste excellent!)

  9. When done remove from the oven, sprinkle with a tiny sprinkle of salt (dividing up the 1/4 teaspoon), serve and enjoy! (Chicken should be easy to cut into and white all the way through.

Serve it Again!

These can be served again and taste just as good! You can warm them up for about 5 minutes in a 350 degree F oven and they will crips up again. Serve them warm with a couple of sides or toss them over a salad with all your favorite toppings!

Tahini Caesar Salad Jars: An easy & satisfying dairy-free salad for parent & young athlete

Wow, I have not posted in a while because life has obviously taken a sudden turn. My typical workday has been turned upside down and new responsibilities and priorities have taken over. However, while life currently looks very different, I still want to write and I still want to share nutrition information and recipes that I think might be valuable to you guys. As you know if you’ve been following along, I try to keep my recipes simple with minimal ingredients and so I hope you can use my site for some helpful resources during this crazy time. These recipes might be helpful because, for some of you, this new schedule has left you with even less time during the day. Yet, for others, this new way of life may mean more time at home and a need to fill some free time for you or for you and your kids. For those in the former group, these take around an hour to completely prep and then you have lunches to quickly grab out of the fridge during the week. For the latter group, this might be a good time to experiment in your kitchen with whatever groceries you have or are able to have on hand and today’s recipe might be a good one to try! Today I’m sharing my Tahini Caesar Salad Jars that you heard me talk about a ton in previous months. It uses pretty common ingredients (except the tahini may be uncommon for some), and, from my recent experience, these items can still found on the shelves in grocery stores.

In the last few months, in an effort to find some easy prep meals and simplify my weekday mornings, I have been trying out different salad jar combinations. My first experiment was these Chicken Caprese Salad Jars and they turned out wonderfully!! Check out my post for the recipe AND how you can tailor them to meet the needs of the young athlete. My second experiment was these Tahini Caesar Salad Jars. If you’ve been following me for a while then you may remember the Tahini Caesar Dressing that I posted a while back. I seriously do love this dressing and am convinced that it makes everything better! I knew I wanted to use that dressing in my ingredient combination for these jars. It took a few tries to get the proportions right for me, but I think this is perfect for your everyday lunch. The tahini dressing takes no time to whip up and you can do that and saute the mushrooms in a skillet while you let the quinoa cook (quinoa is a very low maintenance grain to cook!).

I love the final flavor combinations of this salad as well. I really don’t know which salad jar I like better! With this recipe you will have a little extra tahini dressing and I would save it in an airtight container in your fridge to use for salads, bowls or dipping sauces later in the week. It’s a fabulous and easy way to add a punch of flavor to otherwise simple and, maybe a little bland, dishes.

Tahini Caesar aerial preppeed 3.JPG

So, what about the athlete? How does this salad jar fit into his / her sports nutrition plan (I know many athletes are not able to practice right now. However, I feel it’s still a good time to learn and so I will continue to share tips and facts with you in this space.)? Well, the same rules apply for these as for my Chicken Caprese Salad Jars so I would make sure to give that post a read if you need to up the carbohydrate or change any of the proportions. And, a reminder, while this is a great all-in-one salad, it should not be the only thing the athlete has for lunch. Especially if the athlete is in training season or competition season, this one jar will not be enough. My Chicken Caprese Salad Jar post also has ideas of sides to add along with this lunch so definitely check it out!

So, here you go, the recipe for my Tahini Caesar Salad Jar.s I hope it simplifies your weekdays just a little and helps fuel you and / or your young athlete!

Happy Fueling!

Taylor

Tahini Caesar Salad Jars

Makes 3 jars

INGREDIENTS:

  • 6 tablespoons Tahini Caesar Dressing

  • 1/2 to 1 cup, uncooked quinoa (I always go ahead and cook 1 cup dry so I have leftovers for dinners during the week. If you don’t want leftovers, prepare about 1/2 cup dry quinoa)

  • 3/4 cup halved cherry tomatoes

  • Salt, to taste

  • 3/4 cup quartered roasted baby bella mushrooms

  • 1 1/2 cup diced or pulled store-bought rotisserie chicken

  • 3 cups chopped romaine lettuce

DIRECTIONS:

  1. Whisk together all ingredients for the Tahini Caesar Dressing.

  2. Cook quinoa according to package directions.

  3. While quinoa is cooking, heat a small skillet to medium heat and add the quartered baby bella mushrooms. Cook about 5 to 10 minutes until they start to soften and release their water. Remove from the heat.

  4. Ideally, allow the ingredients to cool as much as you can but, if time doesn’t allow, go ahead and begin assembling.

  5. To assemble each jar add:

    • 2 tablespoons Tahini Caesar dressing

    • 1/4 cup cooked quinoa

    • 1/4 cup halved cherry tomatoes

    • Pinch of salt

    • 1/4 cup quartered roasted baby bella mushrooms

    • 1/2 cup diced or pulled rotisserie chicken

    • Another drizzle of tahini dressing

    • 1 cup chopped Romaine lettuce

  6. Once cooled, add the tops to your containers and store them in the refrigerator for lunches during the week! You can eat them straight from the jar, or dump out the ingredients into a big bowl and toss all ingredients together. I enjoy it both ways, just depends on where I’m eating lunch that day!

Tahini Caesar Deconstructed.jpg